Friday, May 31, 2013

The Amazing Amy


May is a month that is jam packed with things to celebrate: Mother’s Day, Memorial Day, our anniversary and a whole bunch of birthdays! As the month is ending today I want to make sure and send our love out to everyone who makes this month worth celebrating… Thank you to our Mommas and Grandmas who have done so much for us, we love you all very much. Thank you to the brave men and women who are serving and have served to keep us safe, we are so appreciative. Happy birthday to my Dad, you gave me a great example of what to look for in a man. And last but not least happy birthday to the best and most beautiful friends a girl could ask for; Amanda, Amy, Kaitlyn and Samantha, it can’t be a coincidence you were all born in the same month J.
My girl Amy is someone to be celebrated, she is amazing, The Amazing Amy, she is like a super hero; she comes to your rescue! The talent and skill this girl has is incredible. I have known Amy for 11 years and not only is she the kindest most thoughtfully sweet friend but she is also a great photographer and an awesome cake and dessert maker!
Amy can bake and decorate just about anything you’d like and honestly I never know what is better, the look of the dessert or the taste. I have used Amy’s talents for a long list of parties, baby showers and events, and everyone is always so impressed by her work. Here are a few pictures of cakes, cookies, cupcakes and cake pops she has made for me over the last few years…

 
Amy made our wedding cake, it was gorgeous, and a year later on our first wedding anniversary we took the top tier out of the freezer and it was still delicious. Also pictured are the dinosaur cupcakes and dino egg cake pops she made for Callen’s baby shower (our God Son), I wish I had taken a better picture of them instead of using my phone- but they were adorable! For Callen’s first birthday we had a monster theme and she made the cutest monster cookies and a monster smash cake for the bday boy himself. For a 50th birthday fiesta she made us cupcakes, how awesome are those handmade mustache sombrero cupcakes?? They are one of my favorites yet! Latest was this summer when we had a Hawaiian themed surprise party for JD’s mom and grandma, she made the birthday cake, Hawaiian cupcakes and even cake pops that looked like pineapples, they were all beautiful and so scrumptious.
Amy’s personality is as sweet as her desserts and your taste buds will definitely thank you for such a treat. The flavor and design possibilities are endless, I really recommend her to everyone. I am going to put up a little collage of pictures below so you can see more of her creations, but to see even more of her work click on THIS LINK to be taken to her Facebook page where she has a photo album named “Cake Creations: Then and Now”. You can contact her through a message on Facebook, or you can contact me for her info.
Amy is veeery popular with the entire Poplin family, you’ve got to check her out! Have a wonderful weekend!!

          xoxo
                   Rachele


Monday, May 27, 2013

Gallery Wall


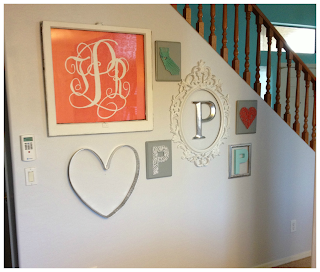
As Phil from Duck Dynasty would say, I am happy happy happy!! (Btw- DD is the best show EVER). While most of you enjoyed a 3 day weekend my man was working hard, BUT our turn is officially here… hello to 3 beautiful days off with the hubs! You won’t be hearing from me again until Friday when I’ll have to say bye to my favorite guy. Before I sign off from the rest of the world for the next 3 days I wanted to put some pics up of our mini gallery wall.
This wall is the awkwardly small triangular shaped wall beneath our stairway and next to our kitchen. It had been staring blankly at me since we moved in, I knew I needed to fill it but I wasn’t sure how to because of the shape. The end result is “the P wall”, JD does not like when I call it that, so of course I had to include it here, hehe J. I call it that because it has our monogram and a collection of the letter “P” for Poplin!
With the exception of an item or two the wall is filled with things that were given to us or made by friends, family and me, so it is even more special when I look at it. The frame around the coral and white monogram is an old window that came from my grandparent’s house, and I have 2 more just like it that I used along our stairway. I l-o-v-e these windows and the fact I will always have a piece of their home in mine. The big fancy looking frame is from Ikea, it comes in black but we spray painted it white and the silver heart is made from the metal off of an old wine barrel. The string art pieces are from my previous post, check it out if you missed it!

I hope everyone has a great week!!

     xoxo
              Rachele

Thank you to April, Heather, Samantha and my hubby for contributing!

Thursday, May 23, 2013

California lovin' craft


In this house we are true California kids at heart, and even though we live in Arizona, California will always be the most popular with us.
Almost everyone knows we moved to Arizona because of JD’s amazing job offer, and while AZ has brought us many awesome things (including our first home) there are so many things about CA that we constantly miss. So, I wanted something in our house to show our CA pride!
I saw a DIY ‘string art’ project on Pinterest and thought it would be fun and easy, and apparently one of my favorite friends thought so too because she bought the supplies and went to work while visiting us in AZ. We made a “P” for Poplin, a heart for looove and an outline of the good ‘ol state of California. All that is needed to make something like this is: string or yarn, nails, a piece of board and a hammer- how simple is that?! I bet everyone has all or most of these things in their house already!

Anywho… I love how these turned out and I used them on a gallery wall downstairs by our kitchen (I will post some pics of the gallery wall soon). The CA turned out super cute, we even put a little heart right over our hometown in Northern Cali. It is a fun homemade piece of décor that reminds us of where we grew up, where we met and where our family and friends are. California will always have our hearts, and now our home has a little bit of California too.

xoxo
              Rachele
 
 
Shout out to Samantha for her craftiness!!

To do:

-         Find a wooden board in the size and shape of your choice (we painted ours gray with left over paint from our kitchen cabinets)

-         Figure out the shape you’d like to make, print it or draw it on paper and cut it out
-         Lay the paper shape on your board and hammer your nails in around the boarder of the shape
-         Once the nails are in remove the paper and start wrapping your string/yarn (make sure to tie the string in a knot around a nail to start)
-         Wrap the string/yarn from nail to nail, don’t miss any nails!
-         Once you are happy with the look tie the string off and cut! DONE!


Friday, May 17, 2013

For the love of Coral (a furniture flip)


           I might be a tiny bit OBSESSED with coral (the color that is). Coral is what’s popular with the Poplins right now… well, maybe not with the Mr., but with me it definitely is!
          Thanks to my close friend, and practically sister, April, I was able to incorporate coral into our front room in a big way! April came to visit and help me with things around the house (she is without a doubt the very definition of a ‘domestic goddess’ and true DIY’er). The two of us transformed a beautiful old hutch into a modern and fun coral piece.
          I was a hesitant to start the project because I had never painted furniture before, but after it was finished I didn’t know what I had been afraid of. Painting the hutch was a breeze, not only was it easy but I thought it was relaxing and sort of fun. There is something very soothing about spending a few hours with a new project and the music up loud.
          For the paint we made our own chalk paint (it is much cheaper than buying chalk paint) all you will need is water, unsanded grout and eggshell or satin paint in the color of your choice. Our paint was Valspar and it was a custom color that fell in between their “Blaze Orange” and “Sweet Melon”. I was really excited how the color turned out because it matched perfectly to a pillow and a few décor items that I already had!
          The whole process only took a few hours and I am really loving the new look of the hutch, and even JD (who thought we were nuts for our color choice) really likes it as well. It adds a great pop of color to the room and is so cheery and fresh. I kept the original drawer pulls on it and spray painted them a vintage white, it really gave the hutch character and kept its old charm. Here are pictures of the before and after, and below are the directions for mixing your own chalk paint and painting furniture. Have a great weekend everyone!!

          xoxo
                   Rachele


Chalk paint:
-    A plastic container that you don’t mind getting messy
-    1 TB of unsanded grout
-    Splash of hot water
-    1 cup of your paint

In your plastic container mix 1 TB of unsanded grout with a splash of hot water (just enough to dissolve the grout). Add your 1 cup of paint and mix it all together- that’s it! Depending on how much paint you need you can double the recipe.

Technique:
-         Lay old sheets or towels down so you don’t leave a mess
-         Remove pulls or knobs and take the drawers out to paint separately
-         Prep the furniture by sanding it down really well to remove the existing finish (a mouse sander with low grit paper works best but you will probably have to sand by hand on the legs and smaller parts)
-         After sanding it down take wet rags and wipe it off really well to remove all of the grit and dust
-         You’re ready to paint- grab your brushes and give it a good coat of paint, don’t worry too much how this coat looks- you’ll be adding another coat or two
-         Once the coat of paint has dried you’ll need to sand it down again and use your wet rags to wipe it clean
-         Add another coat of paint, make sure you get every angle and it looks evenly painted. Let it dry
-         Now that it has its final coat of paint you can sand it again very slightly to give it a distressed look (optional, but it really gives the piece character)
-         Wipe it clean and add a top coat of clear protective finish by painting it on just as you did the paint. This is so the paint doesn’t chip or scratch and you can dust and clean it without worry

We only painted 2 coats of color, but you may need to do 3, just remember to sand and wipe it down between coats of paint. Once the protective finish has dried you can put the knobs and pulls back on and you are set!

Products we used:
-         Keracolor Unsanded Grout with Polymer, in White
-         Minwax Polycrylic Protective Finish, in Clear Satin
-         Valspar paint and primer in Satin


Tuesday, May 14, 2013

Our Wedding


Happy Tuesday everyone! In honor of our 2 year anniversary I am featuring our wedding as my first official post. The hubs and I were married on May 14, 2011, and boy has a lot changed in these 2 short years since we said “I do”. We wed at the Jefferson Street Mansion in Benicia California, and spent 8 months planning, prepping and crafting for our DIY wedding. My bridesmaids, girlfriends and family worked with us to make everything from the décor and centerpieces to my veil and the wedding cake, I can honestly say our sweat, time and sometimes tears went into making this day beautiful for me and JD.
The hard work paid off and thanks to everyone involved, and our amazing photographer, Shannon Cunningham, not only was our wedding perfect, but we were featured on Style Me Pretty. Style Me Pretty is a wedding lover’s dream and I was jumping for joy when I heard our wedding would be featured.
Below are some of my favorite detail shots from the day, for more pictures click here to see our Style Me Pretty feature and please visit Shannon Cunningham's site. Shan is now one of our favorite people, if you have the opportunity to let her capture your memories you will not only love the work she does, but you will love her too.
 
xoxo
          Rachele
 
P.S- Happy Anniversary JD! You truly are my best friend, year #2 of marriage was an awesome adventure, I am so happy to share it with you!


Saturday, May 11, 2013

Welcome!


Why start a blog when there are hundred of thousands out there?? One big reason: to keep my sanity! Of course that isn’t the sole reason for getting my gab on; I also wanted a way to update those closest to us on our new lives here in AZ.
If you move a girl 800 miles away from her friends, family and job you are bound for trouble, and trouble for my husband means projects, paint, and the fear of not knowing what he’ll walk into when he comes home from work. Lucky for me I have the most supportive and patient husband a girl could ask for. I am Rachele, and my sweet husband is JD, the man who gave me the last name that I wear proudly.
With that said, this will be my outlet for ideas, my new best friend, and my way of sharing projects, products, people and places. I can’t wait to keep you updated on what is popular with us, the Poplins.
 
xoxo
          Rachele
 
 
01 09 10